

How To Install Jackshaft Garage Door Opener
How to Install LiftMaster 8500W Jackshaft Opener
- Created:
- November xi, 2022
- Last Updated:
- November 29, 2022
- No Comments
In this guide, we will be going through the steps for installing a LiftMaster model 8500W jackshaft opener on a residential 2-car exclusive garage door. Nosotros are confident that this guide will help you be a better installer and provide better service and value to your customer.
The LiftMaster 8500W model in this guide includes 841LM powered door lock, integrated model 485LM battery for backup power, cable tension monitor and 827LM remote LED low-cal.
The 8500W tin be installed on torsion spring activated door with ane" diameter shaft.
Standard Elevator Door Application
- 15" radius track or greater
- Up to 18' wide doors
- Up to 14' alpine doors
Howdy-lift Applications
- 14' tall
- Up to 54" of hi-elevator
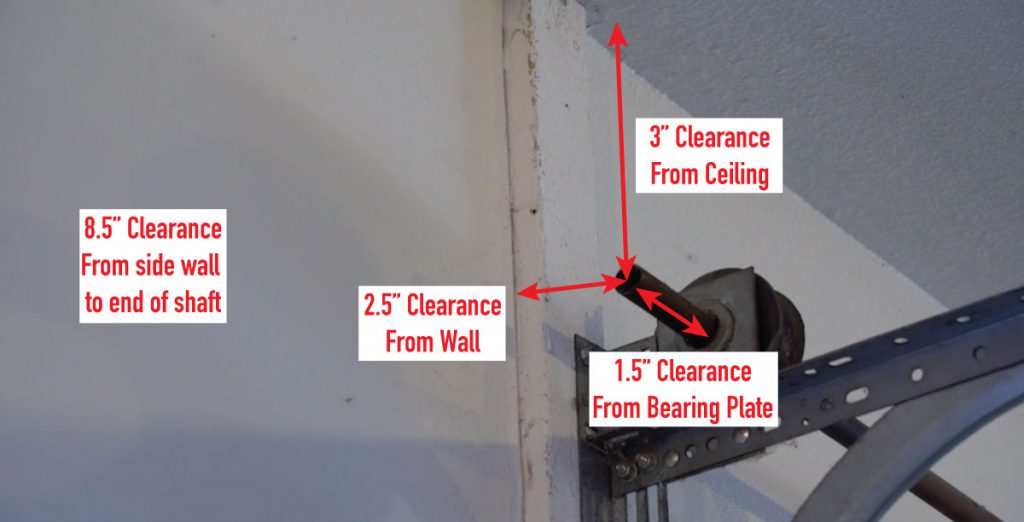
FOR INSTALLATION
- Minimum two.5" clearance from the wall to center of torsion shaft
- Minimum of 3" clearance from ceiling to center of torsion shaft
- Minimum of 8.v" clearance from side wall to the end of the torsion shaft
- Torsion shaft must extend one.5" by the begetting plate
- Disable any locks installed
PRO TIP: Earlier INSTALLATION, ENSURE THE DOOR IS WORKING PROPERLY.
OPERATOR INSTALLATION
- Slide the shaft neckband over the motor shaft of the operator and secure it in place. (*The side of the collar with the larger pigsty should be placed on the motor side.)
PRO TIP: PLACE THE COLLAR Then THAT THE SET SCREWS ARE FACING OUT, MAKING THEM EASIER TO Access.
- Side by side, loosely adhere the slotted side of the mounting bracket to the same side of the garage door opener as the motor shaft. (Leave this loose until information technology is time to secure to the jam.)
- With the garage door in the closed position, place the opener on the finish of the torsion shaft. (Make sure that the shaft collar is clear of the bearing plate and does non make contact.)
- Next, using a level, position and align the garage door opener. Verify that the mounting bracket is located on a solid surface and secure it using the proper hardware.
- Afterward connecting the mounting bracket, secure both the coupling and mounting bracket on the operator.
- Now install the emergency release rope and handle. Mountain it within reach and at least 6' above the garage floor. Ensure that the observe on the handle is right side upwards and secure it with an overhand knot.
SAFETY ITEM INSTALLATION
- Automatic Door Lock Installation -From here we will install the automatic door lock (Role #841LM). The lock must be within x' of the opener and the mountain must be on the aforementioned side. Placement above the third roller is ideal.
- Make clean the inside of the rails and attach the lock installation template. The hole for the lock bolt should exist at to the lowest degree 3 inches from the centre of the third roller. Drill the holes on the template with a 5/16" & ¾" drill bits.
- Next attach the door lock to the outside of the door trim with the hardware provided.
- Run the attached bell wire up to the motor head and plug in the connectors.
THE 8500W IS CAPABLE OF HAVING 2 LOCKS INSTALLED FOR ADDED SECURITY.
- Cablevision Tension Monitor Installation – This required device detects any slack that may occur in the cables and is capable of reversing the door.
- The first step is to position the cable tension monitor, so the roller is two" – half dozen" from the drum & the roller extends past the cable 1/8" – 1/4". (Brand sure the cable is approximately 3/4" from the mounting surface).
- Next drill 3 iii/16" pilot holes & attach the cablevision tension monitor
PRO TIP – Make SURE THE ROLLER IS ON TOP OF THE CABLE.
- Now run the bell wire above and around the opener and connect the wire to the green quick-connect terminal.
- Infrared Safety Eyes – These must exist installed within 6 inches of the bottom of the door
- Run the bell wire to the opener
- Install the white wires to the white terminals and the white & black wires to the greyness terminal
- Wall remote Installation – Information technology is recommended you mount the wall remote five' from the floor or high enough to be out of achieve of small children.
- Run the red and carmine & white wires from the remote to the opener.
- Connect to the red and white terminals on the opener.
BATTERY Fill-in INSTALLATION
- Make sure the power is off and connect the red and black wires to the corresponding terminals on the battery.
- Place the bombardment in the opener and plug in the opener.
PRO TIP: IF THE OPENER IS IN Bombardment BACKUP Fashion, THE MYQ DEVICES WILL BE DISABLED. THE AUTOMATIC DOOR LOCK Volition DISENGAGE AND REMAIN THIS Way UNTIL Ability IS RESTORED.
SET GARAGE DOOR TRAVEL
- Press the aligning button until the "upward" button begins to wink
- Printing and agree the "upwardly" button until the garage door is in the desired position
- Press and release the adjustment button. The garage opener lights will wink twice and the "downwards" push will begin to flash.
- Press and concur the "downward" push until the garage door is in the desired down position
- Press and release the adjustment push button. Programming the garage door travel is now complete.
MYQ REMOTE LED Calorie-free INSTALLATION
- Beginning, pick the desired location and ensure it is inside 6' of an outlet.
- Drill six pilot holes & open the light lens
- Mount the calorie-free with the screws provided
- Your remote light has already been programed from the manufacturing plant to operate with your opener. Whatever additional lights volition need to exist programmed.
To watch this full video and other helpful videos, be sure to cheque out all of Solutions Educational activity courses.
Are you signed up for Solutions Didactics courses? All are free to garage dealers and installers. *Annals Visitor | *Register Employee
(*Must exist a registered company with SSC to access the above registration – Register Here)
Safe Disclaimer: In order to meet all procedures completely, in that location may be condom measures that are not taken past our actors. Exist sure to follow any and all proper safety requirements and refer to your manufacturer's installation manual for details. Your health and safety is the #1 concern. Failure to understand/follow the recommendations in the course could result in property impairment, personal injury or death. While all efforts are made to provide accurate information and guidance, it is impossible to predict all door circumstances. Accordingly, the user agrees that the user of this video; products and information contained herein are at your own risk. In no consequence shall Service Spring be liable for any holding damage, personal injury/death, or any other loss or impairment that may upshot from your use of the information and products provided on this video. All information contained within this site is provided "equally-is" without warranty expressed or implied. User assumes all responsibility/take a chance for use of information and products purchased. If you have any doubts about your power to perform the work safely, we recommend you contact another door professional to complete your repair.

Source: https://www.servicespring.com/how-to-install-liftmaster-8500w-jackshaft-opener/
Posted by: hughesmishe1955.blogspot.com
0 Response to "How To Install Jackshaft Garage Door Opener"
Post a Comment